Why creating an environment for Gym?
OpenAI Gym is the de facto toolkit for reinforcement learning research. Researchers use Gym to compare their algorithms for its growing collection of benchmark problems that expose a common interface. Two important design decisions have been made for this common interface:
- Two core concepts in RL are the agent and the environment. Gym has chosen to only provide an abstraction for the environment, not for the agent.
- The performance of an RL algorithm on an environment can be measured in two ways: first, the final performance; second, the amount of time it takes to learn – the sample complexity. Gym provides the abstraction for logging both of them about the agent’s performance. It can be written in a file, with even a video recording of the agent in action.
These design decisions make Gym an ideal building foundation for any RL environment as writing these capabilities from scratch requires huge resource. For instance,
spacesfrom Gym can be used for having discrete and continuous world definitions very easily.
Gym Environment for Franka Emika Panda
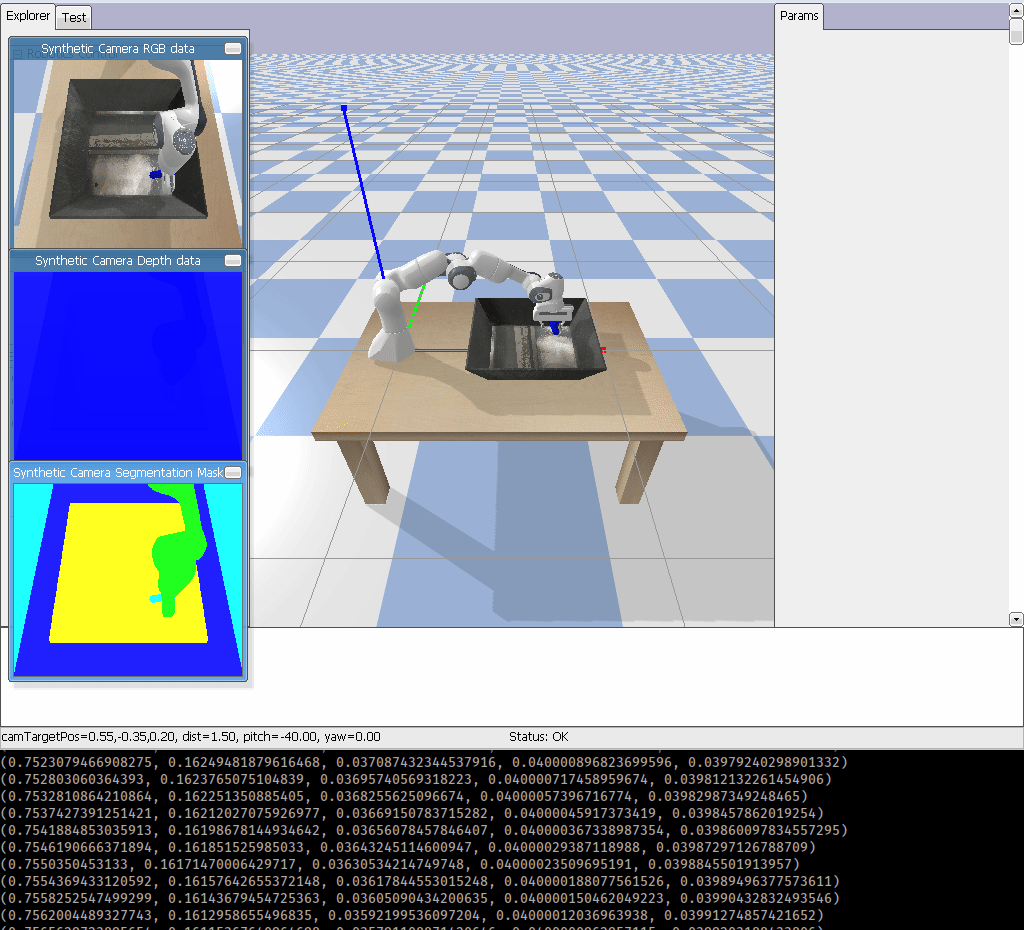
I am going to create a Gym Environment for Franka Emika Panda robot using PyBullet. This environment is useful for testing Robotic Grasping which will look something like:
OpenAI Gym recommends, here, for instance, if you want to create an environment called foo the environment code, foo_env.py, should look something like:
  import gym
  from gym import error, spaces, utils
  from gym.utils import seeding

  class FooEnv(gym.Env):
    metadata = {'render.modes': ['human']}

    def __init__(self):
      ...
    def step(self, action):
      ...
    def reset(self):
      ...
    def render(self, mode='human'):
      ...
    def close(self):
      ...
For this post, I’ll name it gym-panda so I am going to add the functions into panda_env.py. As you saw in the last post, we had to include libraries necessary for PyBullet and interacting with the environment as follows:
import gym
from gym import error, spaces, utils
from gym.utils import seeding

import os
import pybullet as p
import pybullet_data
import math
import numpy as np
import random

class PandaEnv(gym.Env):
    metadata = {'render.modes': ['human']}

    def __init__(self):
        ...
    def step(self, action):
        ...
    def reset(self):
        ...
    def render(self, mode='human'):
        ...
    def close(self):
        ...
First, we need to initialize the environment. I choose to connect to PyBullet using GUI (pybullet.connect(p.GUI).) Then, I adjust the view angle of the environment using p.resetDebugVisualizerCamera().
Every environment comes with an action_space and an observation_space. These attributes are of type Space, and they describe the format of valid actions and observations. Our environment is going to have continuous action and observation space. The Box space represents an n-dimensional box. We are going to read the joint variables of each fingers (there are two fingers) as well as the Cartesian position of the end-effector (since, I assume the gripper is always downward for simplicity, we don’t need the orientation here), so valid observations will be an array of 5 numbers. I also choose the actions to be the target Cartesian position of the end-effector and a joint variable for both fingers which will be an array of 4 numbers. Again for simplicity, I am not considering the orientation since I am assuming the gripper is downward with \(90^\circ\) angle. Box and Discrete are the most common Spaces in Gym. You can sample from a Space or check that something belongs to it. The action_space and observation_space can be defined using spaces.Box(). Finally, The initialization of the environment will be:
def __init__(self):
        p.connect(p.GUI)
        p.resetDebugVisualizerCamera(cameraDistance=1.5, cameraYaw=0, cameraPitch=-40, cameraTargetPosition=[0.55,-0.35,0.2])
        self.action_space = spaces.Box(np.array([-1]*4), np.array([1]*4))
        self.observation_space = spaces.Box(np.array([-1]*5), np.array([1]*5))
Now let’s look at the reset() function. In this function we use pybullet.resetSimulation() to reset the PyBullet environment. Then we add gravity using pybullet.Gravity(). Next is adding the each component of the environment: ground, robot, table, tray, and object using pybullet.loadURDF(). In each reset() call the object is randomly placed in the bin using random.uniform(). We can call pybullet.resetJointState() for each joint to place each joint of the robot in a desired initial pose (rest_poses.) The pose (position and orientation) of the end-effector of the robot can be read using pybullet.getLinkState(). We are interested in pybullet.getLinkState()[0] since we don’t care about the orientation of the gripper. The way Franka Emika Panda robot is defined in URDF file the index for its end-effector is 11 which is needed for the pybullet.getLinkState() function. Joint variables of the fingers can be read using pybullet.getJointState(). Each finger has an index and these indices are 9 and 10. Each finger can be observed and controlled separately in the simulation environment. We can read the joint variable of each finger separately, however, for the sake of simplicity, we consider only one action item for controlling both of them. Finally, we combine state_robot (the position of the gripper/end-effector) and state_fingers (the joint variable for each finger) into observation and return it. Since, we don’t need graphical rendering during loading commponents into the world we can disable the rendering (using pybullet.configureDebugVisualizer(pybullet.COV_ENABLE_RENDERING,0)) in the beginning of the reset() function and enable it in the end (using pybullet.configureDebugVisualizer(pybullet.COV_ENABLE_RENDERING,1).) This is how it looks like:
def reset(self):
        p.resetSimulation()
        p.configureDebugVisualizer(p.COV_ENABLE_RENDERING,0) # we will enable rendering after we loaded everything
        p.setGravity(0,0,-10)
        urdfRootPath=pybullet_data.getDataPath()


        planeUid = p.loadURDF(os.path.join(urdfRootPath,"plane.urdf"), basePosition=[0,0,-0.65])

        rest_poses = [0,-0.215,0,-2.57,0,2.356,2.356,0.08,0.08]
        self.pandaUid = p.loadURDF(os.path.join(urdfRootPath, "franka_panda/panda.urdf"),useFixedBase=True)
        for i in range(7):
            p.resetJointState(self.pandaUid,i, rest_poses[i])

        tableUid = p.loadURDF(os.path.join(urdfRootPath, "table/table.urdf"),basePosition=[0.5,0,-0.65])

        trayUid = p.loadURDF(os.path.join(urdfRootPath, "tray/traybox.urdf"),basePosition=[0.65,0,0])

        state_object= [random.uniform(0.5,0.8),random.uniform(-0.2,0.2),0.05]
        self.objectUid = p.loadURDF(os.path.join(urdfRootPath, "random_urdfs/000/000.urdf"), basePosition=state_object)
        state_robot = p.getLinkState(self.pandaUid, 11)[0]
        state_fingers = (p.getJointState(self.pandaUid,9)[0], p.getJointState(self.pandaUid, 10)[0])
        observation = state_robot + state_fingers
        p.configureDebugVisualizer(p.COV_ENABLE_RENDERING,1) # rendering's back on again
        return observation
Now we are ready to determine what will happen with each env.step(action) command. As I mentioned before the actions are the Cartesian position of the gripper plus a joint variable for both fingers. I am going to use pybullet.calculateInverseKinematics() for calculating target joint variables for the robot. However, we gradually move the robot toward the desired Cartesian position using a variable called dv for smoother inverse kinematics output. p.configureDebugVisualizer(p.COV_ENABLE_SINGLE_STEP_RENDERING) is also used for better rendering. For the sake of simplicity, the gripper orientation is considered to be perpendicular to the ground. I have converted the angles to Quaternion variables using pybullet.getQuaternionFromEuler(). In each step, I read the current Cartesian position (pybullet.getLinkState()) of the gripper and add the small variation toward the target Cartesian position, then calculate the joint variables for reaching to that new Cartesian position ( pybullet.calculateInverseKinematics()), then I apply those joint variables using pybullet.setJointMotorControlArray() instead of pybullet.setJointMotorControl2() to be a one-liner! After attempting to interact with the environment we run the environment for one time step (pybullet.stepSimulation().) Then, I read the state of object, robot gripper and its fingers. I return the gripper and its fingers state as the observation but pass the state of the object as a diagnostic information useful for debugging. It can sometimes be useful for learning. However, official evaluations of your agent are not allowed to use this for learning since it’s cheating!
In the step() function we also determine the reward and if the episode is done. They way I calculated the reward here is that, if the robot grasp the object and pick it up to a certain height (0.45) the agent gets 1 reward and the episode is done. This is how the final step() function looks like:
def step(self, action):
        p.configureDebugVisualizer(p.COV_ENABLE_SINGLE_STEP_RENDERING)
        orientation = p.getQuaternionFromEuler([0.,-math.pi,math.pi/2.])
        dv = 0.005
        dx = action[0] * dv
        dy = action[1] * dv
        dz = action[2] * dv
        fingers = action[3]

        currentPose = p.getLinkState(self.pandaUid, 11)
        currentPosition = currentPose[0]
        newPosition = [currentPosition[0] + dx,
                       currentPosition[1] + dy,
                       currentPosition[2] + dz]
        jointPoses = p.calculateInverseKinematics(self.pandaUid,11,newPosition, orientation)

        p.setJointMotorControlArray(self.pandaUid, list(range(7))+[9,10], p.POSITION_CONTROL, list(jointPoses)+2*[fingers])

        p.stepSimulation()

        state_object, _ = p.getBasePositionAndOrientation(self.objectUid)
        state_robot = p.getLinkState(self.pandaUid, 11)[0]
        state_fingers = (p.getJointState(self.pandaUid,9)[0], p.getJointState(self.pandaUid, 10)[0])
        if state_object[2]>0.45:
            reward = 1
            done = True
        else:
            reward = 0
            done = False
        info = state_object
        observation = state_robot + state_fingers
        return observation, reward, done, info
As I said reading the object status directly from the environment is not practical. Most probably, we want a vision system, for instance, gives us the position and orientation of the object using a camera mounted in the environment. So let’s add that! Before applying each step() we render() the camera output and possibly feed it into a Neural Network (NN) which outputs the pose of the object. So we write a render() function in which we place the camera at a desired position and orientation in the environment using pybullet.computeViewMatrixFromYawPitchRoll(). Then, in order to get the camera image using pybullet.getCameraImage() we need to calculate view_matrix and proj_matrix which are the outputs of p.computeViewMatrixFromYawPitchRoll() and p.computeProjectionMatrixFOV(), respectively. This is how the final render() function will look like:
def render(self, mode='human'):
        view_matrix = p.computeViewMatrixFromYawPitchRoll(cameraTargetPosition=[0.7,0,0.05],
                                                            distance=.7,
                                                            yaw=90,
                                                            pitch=-70,
                                                            roll=0,
                                                            upAxisIndex=2)
        proj_matrix = p.computeProjectionMatrixFOV(fov=60,
                                                     aspect=float(960) /720,
                                                     nearVal=0.1,
                                                     farVal=100.0)
        (_, _, px, _, _) = p.getCameraImage(width=960,
                                              height=720,
                                              viewMatrix=view_matrix,
                                              projectionMatrix=proj_matrix,
                                              renderer=p.ER_BULLET_HARDWARE_OPENGL)

        rgb_array = np.array(px, dtype=np.uint8)
        rgb_array = np.reshape(rgb_array, (720,960, 4))

        rgb_array = rgb_array[:, :, :3]
        return rgb_array
Now we should be able to also close the environment:
    def close(self):
        p.disconnect()
Ok, we are done. I have also published the code here on GitHub. Now, let’s publish and install our Gym environment.
How to publish the new environment for Gym?
If you are interested to publish your environment on PyPI for other researchers to be able to test their algorithms on you environment you should do the following steps:
-
Create a new account on PyPI
-
Setup the following packages:
pip install setuptools wheel twine -
For creating a new repo called gym-foo, It should have at least the following files:
gym-foo/ README.md setup.py gym_foo/ __init__.py envs/ __init__.py foo_env.py -
gym-foo/setup.pyshould have:import setuptools from pathlib import Path setuptools.setup( name='gym_foo', version='0.0.1', description="A OpenAI Gym Env for foo", long_description=Path("README.md").read_text(), long_description_content_type="text/markdown", packages=setuptools.find_packages(include="gym_foo*"), install_requires=['gym'] # And any other dependencies foo needs ) -
gym-foo/gym_foo/__init__.pyshould have:from gym.envs.registration import register register( id='foo-v0', entry_point='gym_foo.envs:FooEnv', ) -
gym-foo/gym_foo/envs/__init__.pyshould have:from gym_foo.envs.foo_env import FooEnv -
gym-foo/gym_foo/envs/foo_env.pyshould look something like:import gym from gym import error, spaces, utils from gym.utils import seeding class FooEnv(gym.Env): metadata = {'render.modes': ['human']} def __init__(self): ... def step(self, action): ... def reset(self): ... def render(self, mode='human'): ... def close(self): ... -
Make source and build distributions:
python setup.py sdist bdist_wheel -
Upload the package to PyPI:
twine upload dist/*use your PyPI username and password.
-
You can install your package with
pip install -e gym-foolocally or if you have uploaded it to PyPI you can install it withpip install gym-foo, then you can create an instance of the environment withgym.make('gym_foo:foo-v0')
Now that we installed our environment, we can use it and test different algorithms on it. Because, it would be too boring to end this post here, I try to solve the environment with a little bit of cheating! In the next post I will explain how to solve the environment using a NN, for instance. Here I have provided Deep Q Learning (DQN) and Proximal Policy Optimization (PPO) for a different environment consisting of a KUKA robot.
Using the Gym Environment
Installation
As I mentioned before, to get started, you’ll need to have Python 3.5+ installed. Simply install gym-panda using pip:
pip install gym-panda
And you’re good to go!
Building from Source
If you prefer, you can also clone the gym-panda Git repository directly. Download and install using:
git clone https://github.com/mahyaret/gym-panda
cd gym-panda
pip install -e .
Environment
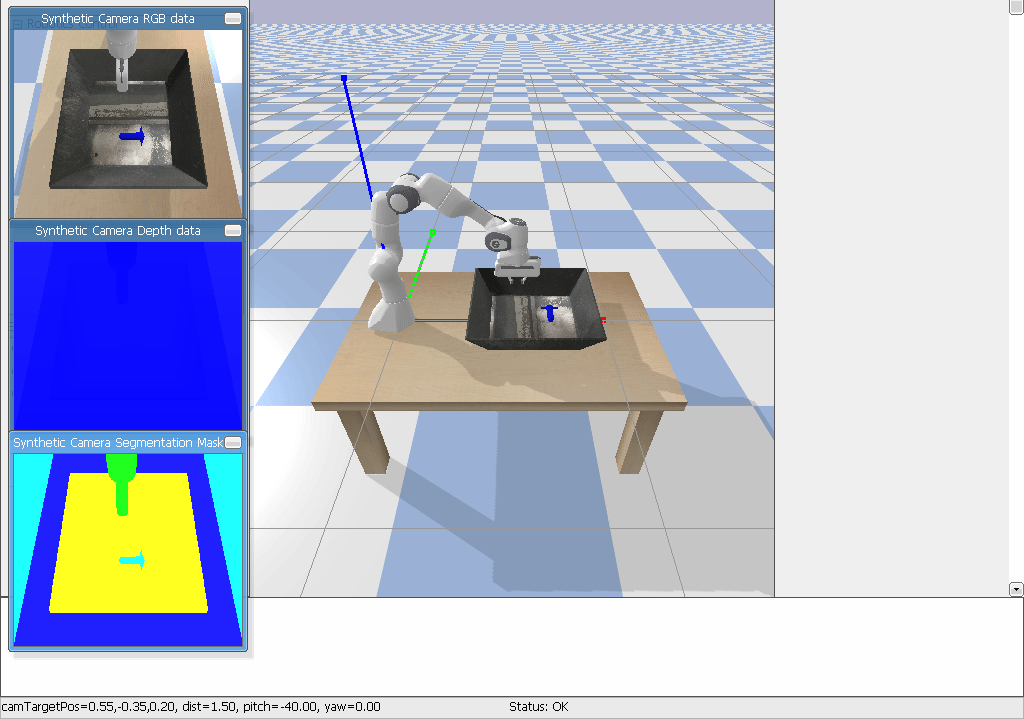
Here’s a bare minimum example of getting something running. This will run an instance of the environment for 1000 time steps, rendering the environment at each step. You should see a window pop up rendering the panda environment.
import gym
import gym_panda
env = gym.make('panda-v0')
env.reset()
for _ in range(1000):
    env.render()
    env.step(env.action_space.sample()) # take a random action
env.close()
It should look something like this:
Observations
The environment’s step() function returns exactly what we need. In fact, step() returns four values. These are:
observation(object): an environment-specific object representing your observation of the environment. \([x_{gripper}, y_{gripper}, z_{gripper}, J_{finger_1}, J_{finger_2}]\)reward(float): amount of reward achieved by the previous action. zero or one.done(boolean): whether it’s time toresetthe environment again.donebeingTrueindicates the episode has terminated and object reached to a0.45height.info(dict): diagnostic information useful for debugging. \([x_{object}, y_{object}, z_{object}]\)
This is just an implementation of the classic “agent-environment loop”. Each timestep, the agent chooses an action, and the environment returns an observation and a reward.
The process gets started by calling reset(), which returns an initial observation. So a more proper way of writing the previous code would be to respect the done flag:
import gym
import gym_panda
env = gym.make('panda-v0')
for i_episode in range(20):
    observation = env.reset()
    for t in range(100):
        env.render()
        print(observation)
        action = env.action_space.sample()
        observation, reward, done, info = env.step(action)
        if done:
            print("Episode finished after {} timesteps".format(t+1))
            break
env.close()
This should give a video and output like the following. You should be able to see where the resets happen.
(0.4315144557623375, -5.493916819482932e-12, 0.23461528774212148, 0.07200035824575761, 0.07199965778586125) (0.4302524987105321, -0.0020018997593715246, 0.23235069754810492, 0.06480035474735481, 0.06479966227185677) (0.42694589831820745, -0.004337753847413993, 0.2292686048058497, 0.06006588304341822, 0.059839729817485414) (0.4253030473182287, -0.006074176816533569, 0.22529513086260297, 0.05405824269258608, 0.053856696568919664) (0.42450497006559634, -0.002171509554405005, 0.22496705461511565, 0.04865235891506769, 0.04847108310294325) (0.42115238533614485, 0.0018229758326816492, 0.22635436372439022, 0.04699980585468133, 0.0467768664823546)
PD Controller
This part is only for illustrating how we can use the Gym environment that we’ve just created and it is not by any means practical. It is a simple Proportional Derivative (PD) Controller. We used the default timestep in pybullet which is 240 Hz for calculating derivative. There are three states in this solution: first, reaching the object; second, closing the gripper; third, picking up the object. We use diagnostic information from environment to locate the object. That is why I said this solution is not practical and is just for illustration. Proportional gain, \(k_p\), and derivative gain, \(k_d\) are designed to be 10 and 1, respectively. The error for the controller is considered to be 0.01. I repeat 20 episodes of running at most 100 time steps for each to show the solution’s performance.
import gym
import gym_panda

env = gym.make('panda-v0')

done = False
error = 0.01
fingers = 1
info = [0.7, 0, 0.1]

k_p = 10
k_d = 1
dt = 1./240. # the default timestep in pybullet is 240 Hz
t = 0

for i_episode in range(20):
    observation = env.reset()
    fingers = 1
    for t in range(100):
        env.render()
        print(observation)
        dx = info[0]-observation[0]
        dy = info[1]-observation[1]
        target_z = info[2]
        if abs(dx) < error and abs(dy) < error and abs(dz) < error:
            fingers = 0
        if (observation[3]+observation[4])<error+0.02 and fingers==0:
            target_z = 0.5
        dz = target_z-observation[2]
        pd_x = k_p*dx + k_d*dx/dt
        pd_y = k_p*dy + k_d*dy/dt
        pd_z = k_p*dz + k_d*dz/dt
        action = [pd_x,pd_y,pd_z,fingers]
        observation, reward, done, info = env.step(action)
        if done:
            print("Episode finished after {} timesteps".format(t+1))
            break
env.close()
In the next post I will explain a practical way to solve this environment.