Why using OpenAI Spinning Up?
Reinforcement learning results are tricky to reproduce: performance is very noisy, algorithms have many moving parts which allow for subtle bugs, and many papers don’t report all the required tricks. With code bases like OpenAI Baselines or OpenAI Spinning Up, researchers can spend less time implementing preexisting algorithms and more time designing new ones. I think the best educational resource for deep reinforcement learning (deep RL) can be found here which is produced by OpenAI.
This module contains a variety of helpful resources, including:
- a short introduction to RL terminology, kinds of algorithms, and basic theory,
- an essay about how to grow into an RL research role,
- a curated list of important papers organized by topic,
- a well-documented code repo of short, standalone implementations of key algorithms,
- and a few exercises to serve as warm-ups.
In this post, I will explain how to use the algorithms in this module for the Franka Emika Panda robot environment that we have developed using PyBullet in part two. Pleas note that this is not a Reinforcement Learning tutorial and it’s only for familiarization with PyBullet and Gym. Here I will describe how PyBullet and Gym can interact and how to use Gym Wrappers.
Using the Gym Environment
as a recap this is how you obtain the code for gym-panda. You can simply install gym-panda using pip:
pip install gym-panda
or you can build it from Source:
git clone https://github.com/mahyaret/gym-panda
cd gym-panda
pip install -e .
The observation signals are as follows:
observation(list): \([x_{gripper}, y_{gripper}, z_{gripper}, J_{finger_1}, J_{finger_2}]\)reward(float): zero if object is not picked up or one if object is picked up to a0.45height.done(boolean): whether it’s time toresetthe environment again.donebeingTrueindicates the episode has terminated and object reached to a0.45height.info(list): \([x_{object}, y_{object}, z_{object}]\)
Installing Sinning Up
Spinning Up requires Python3, OpenAI Gym, and OpenMPI. Spinning Up is currently only supported on Linux and OSX. Here, I only mention the process for Debian/Ubuntu for the detailed installation process please refer to here.
-
Install OpenMPI:
sudo apt-get update && sudo apt-get install libopenmpi-dev -
Clone and install Spinning Up
git clone https://github.com/mahyaret/spinningup.git
cd spinningup
pip install -e .
Ok why my fork of Spinning Up?! because in this fork I made a small change of including Convolutional Neural Network, since we want to use image from our environment as state. I’ll explain later.
Why applying PPO?
In this post, I am going to play with the environment using Proximal Policy Optimization (PPO). All core deep RL algorithms are implemented in the Spinning Up package to reflect useful progressions of ideas from the recent history of the field to state of the art. PPO, in particular is close to state of the art on reliability and sample efficiency among policy-learning algorithms. It also exposes some of the trade-offs that get made in designing and using algorithms in deep RL. A great introduction to RL Algorithms can be found here.
PPO in Summary
The key idea underlying policy gradients is to push up the probabilities of actions that lead to higher return, and push down the probabilities of actions that lead to lower return, until you arrive at the optimal policy. PPO provides a way to reuse the states and actions that we already observed and performed. However, there is a problem in reusing, since you want your gradient-based method moves toward the optimal point of the current policy, not some old policy you already obtained by your previous experiences. But what if the old and current policies are so similar that we can reuse them in optimizing a Surrogate function which also eventually leads us to an optimal policy. As I said before, this is not a RL tutorial and here we don’t care if our solution actually solves the environment.
Gym Wrappers
There are cases that you may want to extend the environment’s functionality. For instance, an environment gives you raw RGB image and you want to change it to gray-scale image. There are many similar situations that you may want to “wrap” the existing environment and add customized functionality. Gym provides a convenient framework for these situations – the Wrapper class. There are different wrapper classes that can be used:
- ObservationWrapper : This exposes the
observation(obs)method, which can modify the observation from the wrapped environment. - RewardWrapper : This exposes the
reward(rew)method, which can modify the reward value given to the wrapped environment. - ActionWrapper : This exposes the
action(act)method, which can modify the action passed to the wrapped environment.
Spinning Up in Franka Emika Panda
Now that these introductions are out of the way let’s modify our environment and apply Spinning Up PPO on it. As you saw in the last two post: Part 1 and Part 2, we had to include libraries necessary for PyBullet and interacting with the environment as follows:
from spinup import ppo_pytorch as ppo
import torch.nn as nn
import gym
import gym_panda

import matplotlib.pyplot as plt

import numpy as np
import cv2

import spinup.algos.pytorch.ppo.core as core


class ProcessFrame84(gym.ObservationWrapper):
    ...

class ImageToPyTorch(gym.ObservationWrapper):
    ...

class MoveTowardZ(gym.ActionWrapper):
    ...


env = gym.make('panda-v0')
env = ProcessFrame84(env)
env = ImageToPyTorch(env)
env = MoveTowardZ(env)
As you saw earlier, the observation space of the environment was limited to the robot status. The environment also has a render() function that returns camera image. I want to change the observation of the environment to be image-based. Replacing the observation to be the camera image may help the policy to locate the object. In order to change the observation we define an ObservationWrapper class: ProcessFrame84 in which we have the observation() method. This method returns the output of render() function after processing it. During the initialization, we also redefine the observation_space to match the new observation. process() function is for scaling down the image and turning it into back and white image.
class ProcessFrame84(gym.ObservationWrapper):
    def __init__(self, env=None):
        super(ProcessFrame84, self).__init__(env)
        self.env = env
        self.observation_space = gym.spaces.Box(
            low=0, high=255, shape=(84, 84, 1), dtype=np.uint8)

    def observation(self, obs):
        return ProcessFrame84.process(self.env.render(mode='rgb_array'))

    def process(frame):
        if frame.size == 720 * 960 * 3:
            img = np.reshape(frame, [720, 960, 3]).astype(
                np.float32)
        else:
            assert False, "Unknown resolution."
        img = img[:, :, 0] * 0.399 + img[:, :, 1] * 0.587 + \
              img[:, :, 2] * 0.114

        resized_screen = cv2.resize(
            img, (112, 84), interpolation=cv2.INTER_AREA)
        y_t = resized_screen[:, 14:98]
        y_t = np.reshape(y_t, [84, 84, 1])
        return y_t.astype(np.uint8)
As PyTorch requires different order of channel, width, and height for image input we define another ObservationWrapper class ImageToPyTorch. In this class we make the image compatible with the PyTorch requirement.
class ImageToPyTorch(gym.ObservationWrapper):
    def __init__(self, env):
        super(ImageToPyTorch, self).__init__(env)
        old_shape = self.observation_space.shape
        new_shape = (old_shape[-1], old_shape[0], old_shape[1])
        self.observation_space = gym.spaces.Box(
            low=0.0, high=1.0, shape=new_shape, dtype=np.float32)

    def observation(self, observation):
        return np.moveaxis(observation, 2, 0)
There are cases that you may want to make the environment a little bit easier to solve. For instance, it is safe to assume that you always want to move toward the bin in the \(Z-axis\) direction. In that case, you need to modify the environment using the ActionWrapper. Here we defined such wrapper class, MoveTowardZ.
class MoveTowardZ(gym.ActionWrapper):
    def __init__(self, env):
        super(MoveTowardZ, self).__init__(env)

    def action(self, action):
        action[2] = -.3
        return action
Now we can define our Gym environment and wrap it with the wrapper classes that we defined:
env = gym.make('panda-v0')
env = ProcessFrame84(env)
env = ImageToPyTorch(env)
env = MoveTowardZ(env)
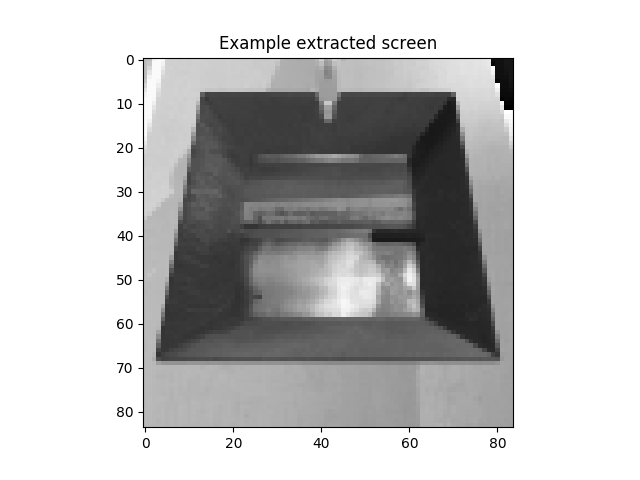
We can illustrate the observation of our environment:
image = env.reset()
plt.figure()
plt.imshow(image.squeeze(),cmap='gray')
plt.title('Example extracted screen')
plt.show()
The output should look like the following:
Ok now we are ready to apply the Spinning Up PPO. As mentioned in the OpenAI Spinning Up documentation:
They [algorithms] are all implemented with MLP (non-recurrent) actor-critics, making them suitable for fully-observed, non-image-based RL environments, e.g. the Gym Mujoco environments.
I had to add the Convolutional Neural Network (pretrained ResNet) to their implementation. That is why in the beginning , I used my fork of Spinning Up to install it. For Applying PPO to our environment we can:
env_fn = lambda : env
ac_kwargs = dict(hidden_sizes=[18,64,64], activation=nn.ReLU)

logger_kwargs = dict(output_dir='spinup', exp_name='panda_ppo')

ppo(env_fn=env_fn,actor_critic=core.CNNActorCritic, ac_kwargs=ac_kwargs, steps_per_epoch=5000, epochs=250, logger_kwargs=logger_kwargs)
the first element of hidden_sizes determines which pretrained ResNet to use. The available choices are 18, 34, 50, 101, and 152.
Running the algorithm may not be able to solve the Panda environment, but my main purpose was to show how to use PyBullet for a Gym environment, and also how to modify it if needed.